Form Prefilling & Personalization – User Guide
Introduction
LeadGen Forms offers powerful URL-based prefilling and personalisation features that allow you to: – Pre-fill form fields with data from URL parameters – Personalize the user experience with dynamic greetings and messages – Hide fields when values are provided via URL – Capture hidden data from URL parameters without showing fields to users
These features are perfect for:
– Email campaigns (pre-fill subscriber information)
– Ad campaigns (track source and pre-fill known data)
– Personalized landing pages (greet users by name)
– Multi-step funnels (pass data between pages)
Form Prefilling from URL
What is Form Prefilling?
Form prefilling automatically fills in form fields based on URL parameters. This creates a better user experience by reducing the amount of typing required.
How It Works
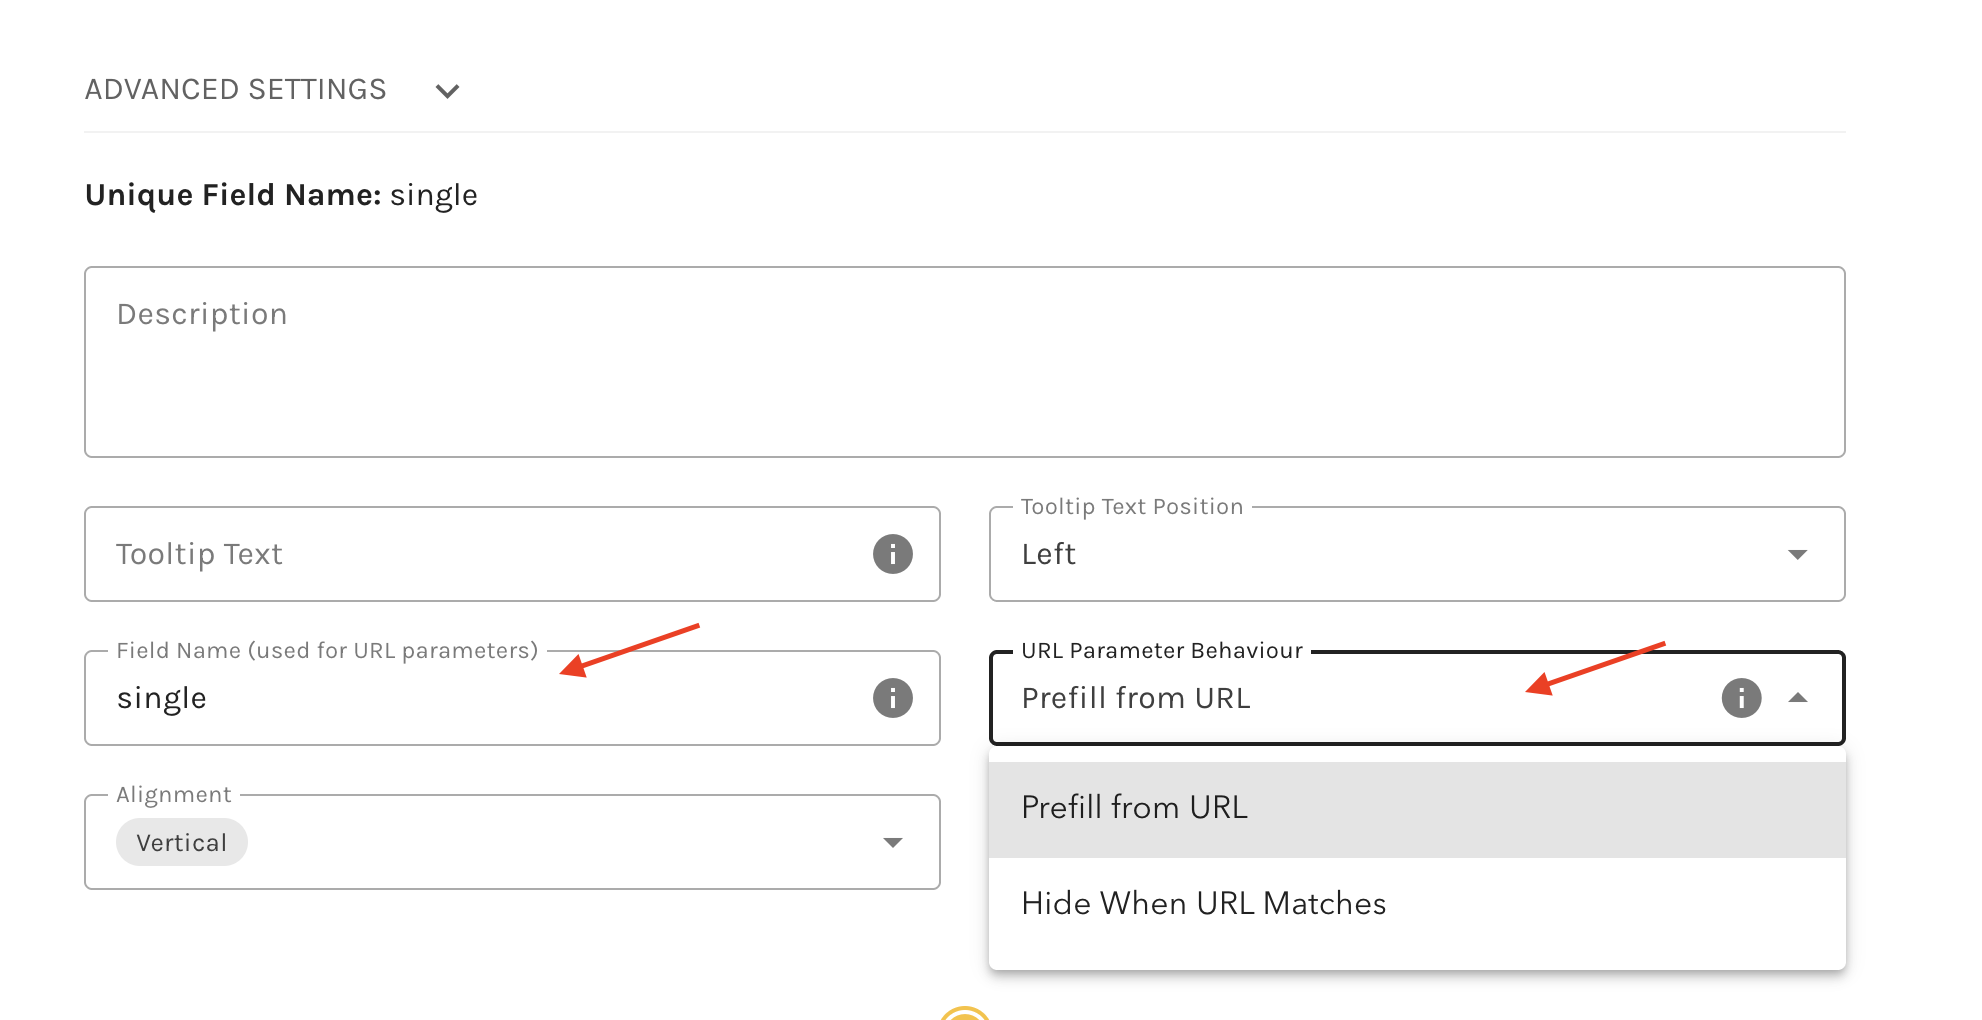
Step 1: Set the Field Name
Open your form in the editor. Choose any question you want to apply this feature to. Now scroll down to Advanced Settings and find the Field Name (used for URL parameters).
Enter a unique name (e.g., first_name, email, phone)
Step 2: Add URL Parameters
Use the field name in your URL with the value you want to pre fill.
https://yoursite.com/form?first_name=John&email=john@example.com
Step 3: Test Your Form
Open the URL in your browser and watch the fields auto-populate!
Setting Up Field Names
Best Practices for Field Names:
- Use lowercase letters
- Use underscores instead of spaces (first_name, not first name)
- Keep them short and descriptive
- Make them unique within your form
- Avoid special characters (except underscore)
- Don’t use spaces
Examples:
Good Field Names:
– first_name
– email_address
– phone_number
– company_name
– job_title
Bad Field Names:
– First Name (has space)
– email@address (special character)
– Phone# (special character)
Personalising Forms with Hidden Fields
What are hidden fields?
Hidden fields capture data from URL parameters without displaying input fields to users. They’re perfect for:
– Tracking campaign sources
– Storing referral codes
– Capturing user IDs
– Personalising content with Answer Piping
Setting Up Hidden Fields
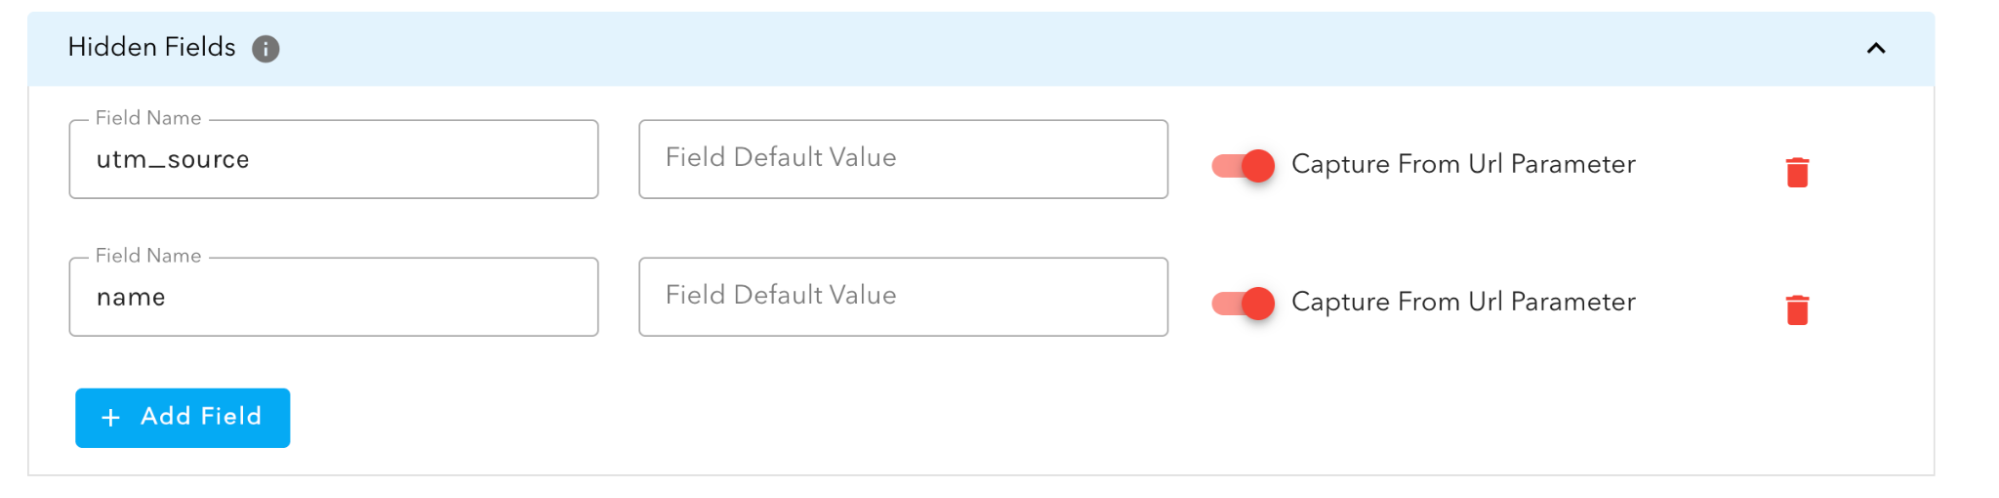
Step 1: Create Hidden Fields
- In your form editor, scroll all the way down to the Hidden Fields section.
- Click “Add Hidden Field”
- Give it a unique name (e.g., name, utm_source, campaign_id)
- Enable “Capture from URL” if you want to capture the value from URL parameters automatically
Real-World Example: Personalized Email Campaign
Scenario: You’re sending an email campaign to your subscribers.
Setup:
1. Create hidden fields: first_name, email, campaign_source
2. Add to your welcome message: “Hi {{first_name}}, thanks for your interest!”
3. Build your email links:
https://yoursite.com/form?first_name=Emma&email=emma@example.com&campaign_source=newsletter_jan_2024
Result: – User sees: “Hi Emma, thanks for your interest!” – Form captures: email and campaign_source in the background – User only fills in missing information
Hiding Form Fields
What is Field Hiding?
Instead of showing pre-filled fields to users, you can completely hide questions when values are provided via URL. This creates a cleaner, shorter form experience.
Setting Up Field Hiding
Step 1: Set the URL Parameter Behaviour
Open your form in the editor and click on the question you want to configure.
Now scroll to Advanced Settings and find the URL Parameter Behavior dropdown. Now select your preferred option:
- Prefill from URL (default)—Shows the field with a pre-filled value
- Hide When URL Matches—Hides the field when a URL parameter is provided
Step 2: Set the Field Name
Make sure the question has a Field Name set (as described in the Form Prefilling section).
Step 3: Test with URL Parameters
Example with “Prefill from URL”:
https://yoursite.com/form?email=john@example.com
Result: Email field is visible and pre-filled with “john@example.com”
Example with “Hide When URL Matches”:
https://yoursite.com/form?email=john@example.com
Result: Email field is completely hidden, value is captured in the background
When to Use Each Option
Use “Prefill from URL” when:
- You want users to see and verify the pre-filled data
- The data might be incorrect, and users should be able to change it
- You’re pre-filling optional information
- Transparency is important (users should see what data is being submitted)
Use “Hide When URL Matches” when:
- You’re certain the data is correct
- You want to shorten the form
- The data is for tracking purposes (campaign source, UTM parameters)
- You’re passing user IDs or other system data
- You want to create a more personalized experience
Important Notes on Hiding
- Hidden fields still submit their values with the form
- Required validation still applies – field won’t hide if URL value is empty
- Users can’t edit hidden field values
- Only hide fields when you’re confident the data is correct
Supported Question Types
Fully Supported Question Types
These question types work with both prefilling and hiding:
Text-Based Questions
- Short Text – Plain text input
- ?short_text=Hello World
- First Name – First name field
- ?first_name=John
- Last Name – Last name field
- ?last_name=Smith
- Paragraph Text – Multi-line text
- ?comments=This is a long comment with multiple lines
- Email Address – Email field
- ?email=john@example.com
- URL – Website URL field
- ?website=https://example.com
Number Questions
- Number – Numeric input
- ?quantity=5
-
- Range/Scale – Slider or Likert scale
- ?satisfaction=4
- Range/Scale – Smiley’s Skin
?smiley=Very Unsatisfied or Your custom value
?smiley=Unsatisfied or Your custom value
?smiley=Neutral or Your custom value
?smiley=Satisfied or Your custom value
?smiley=Very Satisfied or Your custom value
Note: For smiley skin, the default values are Very Unsatisfied, Unsatisfied, Neutral, Satisfied, and Very Satisfied.
You can either use those or add your custom values for smileys by enabling the set custom text for smileys toggle.
Date Questions
- Date – Date picker (all skins)
- Formats supported:
?date=2024-12-31 (YYYY-MM-DD)
Selection Questions
- Single Choice – Radio buttons, dropdowns, buttons, icons, images
- ?color=Red
Note: Value must match the choice label exactly
- Multiple Choice – Checkboxes, multi-select
- ?colors=Red,Blue,Green
Note: Separate multiple values with commas
Phone Number
- Phone Number – Phone input with country code
- ?phone=+14155551234
Note: Include country code for best results
Yes/No Questions
- Yes/No – Toggle or switch
- ?subscribe=yes
?subscribe=no
Accepted values:
For “Yes”: yes, true, 1
For “No”: no, false, 0
Address Questions
- Address – Multi-field address input
- ?address_line_1=123 Main Street
?address_line_2=Apt 4B
?address_city=San Francisco
?address_state=California
?address_country=United States
?address_post_code=94102
- Notes:
- – In the example above, the address serves as the field name. Therefore, the fields should follow this format: {address}_line_1. The first part can be any string you define, but you must adhere to the specified format. E.g, my_address_state=California&my_address_country=United States
- – Field names are based on your address field configuration
– Country matching is case-insensitive (India, India, INDIA all work)
– To hide the address question, ALL enabled fields must have values
GDPR/Consent
- GDPR – Consent checkboxes
- ?gdpr=Email Updates,SMS Notifications
Notes:
– Match checkbox labels exactly (case-insensitive)
– Separate multiple items with commas
– Prefills: Checks the items you specify
– Hiding: Only hides if ALL required items are provided
Not Supported Question Types
These question types do NOT support URL prefilling:
- File Upload – Security reasons (files can’t be uploaded via URL)
Examples & Use Cases
Example 1: Email Marketing Campaign
Goal: Pre-fill subscriber information from your email list
Setup:
Hidden Fields:
– subscriber_id
– email
Form Questions:
– first_name (Prefill from URL)
– company (Prefill from URL)
– phone (Prefill from URL)
– message (NOT prefilled)
Welcome Message:
“Hi {{first_name}}, tell us more about your needs!”
Email Link:
https://yourform.com/contact?subscriber_id=12345&email=sarah@company.com&first_name=Sarah&company=Acme Corp&phone=555-0123
User Experience:
1. Opens form from email
2. Sees: “Hi Sarah, tell us more about your needs!”
3. Form shows first name, company, and phone already filled
4. Only needs to type their message 5. Submits form quickly
What You Capture: – subscriber_id: 12345 (hidden) – email: sarah@company.com (hidden) – first_name: Sarah (pre-filled, editable) – company: Acme Corp (pre-filled, editable) – phone: 555-0123 (pre-filled, editable) – message: (user typed)
Example 2: Multi-Step Funnel
Goal: Pass data from the landing page to the form on another page
Setup:
Page 1 (Landing Page):
<a href=“https://yourform.com/signup?industry=Healthcare&company_size=50-100&interest=Software”>
Get Started
</a>
Page 2 (Form):
Hidden Fields:
– industry (captured from URL)
– company_size (captured from URL)
– interest (captured from URL)
Form Questions:
– first_name
– email
– phone
– message
Welcome Message:
“We help {{industry}} companies like yours succeed!”
User Experience:
1. Lands on page, clicks “Get Started”
2. Sees form with: “We help Healthcare companies like yours succeed!”
3. Fills in personal information
4. Submits
What You Capture: – All the context from the landing page (industry, company_size, interest) – Personal contact information from the form